Tuesday, December 9, 2014

DIY Picture Ornaments!

Need a handmade gift for friends or family?  An ornament with pictures is the perfect gift!

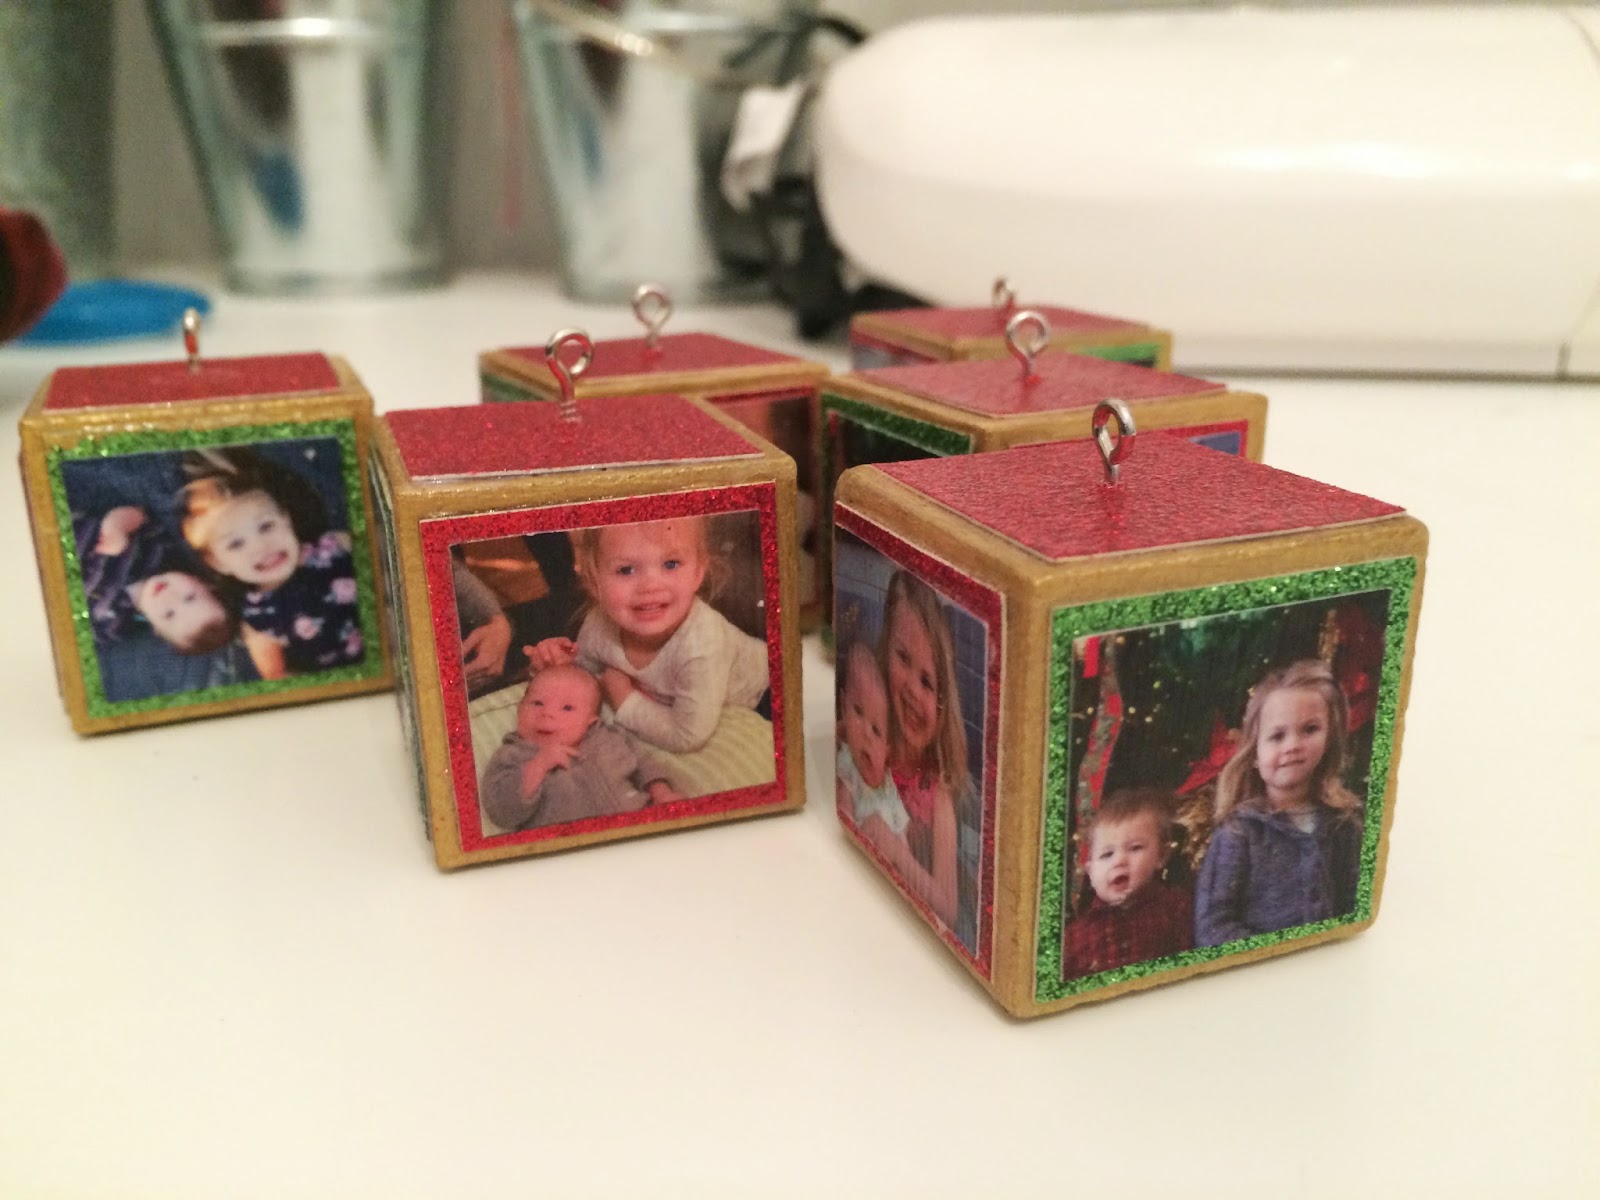
Supplies You'll Need:
- Mod Podge
- paper (will go underneath the pictures)
- 1 in square pictures
- unfinished wood blocks
- screws 
- string
- scissors
- paint
- paintbrush
- needle nose pliers

STEP 1 - choose your pictures and crop them into 1 in squares.  I cropped mine in MS Word.  I then took my Word.doc to Kinkos via a flash drive and had them print an 8x10 of all my pictures on glossy cardstock. 

STEP 2 - paint your wood blocks in the color of your liking.  I chose gold for mine. 

STEP 3 - cut the paper that will go underneath your photo.  (I chose green and red sparkle cardstock paper from Hobby Lobby). I cut mine slightly less than the blocks so that the gold paint would show through. 

STEP 4 - Mod Podge time!  Apply Mod Podge on the paper and glue to the wood block.  You'll want to add weight to the paper/block so the paper doesn't curl up.  I turned mine face down on the table which was plenty of weight.  I did one piece of paper at a time until it was dry.  

STEP 5 - Mod Podge picture to the paper.  Same method as above..apply weight. 

STEP 6 - Mod Podge over the picture.  Don't worry...it dries clear!

STEP 7 - screw in eye screw.  I made an initial hole with a push pin to get the screw started then I screwed in the rest by hand.  Be careful not to snap your eye screw...I did that twice.  Once you can't twist it anymore, use pliers to finish (this is where it may snap so be careful!)

STEP 8 - tie a string through the eye screw. 

STEP 9 - Hang on a tree or gift to friends/family!


How I decorate for the holidays!

I LOVE the holiday season, especially since I have two small children AND we're in our first house.  I wanted to keep the decorating simple because I don't want to store a bunch of decorations for 11 months.  

SOOO here's what I came up with!!!

Happy Holidays to you and your family!


Mantel - bought cheap red & gold ornaments from the dollar store and put them in two vases.  Added the red candlesticks for a little pizazz.  (I think shimmery gold candlesticks may look better so I'll be on the lookout for some).

The Bucilla stocking kits are a tradition in my family.  My mom made mine when I was little and I made my husband's and two kids.  They take forever to make so give yourself a few months. 

I bought wood letters from Hobby Lobby and wrapped them in burlap.

My mitten advent calendar on display.  I made all the mittens last year and was so excited to hang them up this year!

My mother-in-law made the santa felt picture for us a few years ago.  It's made out of triangles and squares.  How cool is that?

Friday, October 3, 2014

DIY Tissue Paper Pom Poms


Tissue Paper Flower Tutorial
Looking for a SIMPLE and FAST way to add a little flare to gift wrap?  Look no further than tissue paper flowers.   

1) Layer 8 pieces of tissue paper
2) Cut a circle of your choosing & scallop the edges
3) Staple the center (I use two staples for larger flowers)
4) Separate the flowers and "scrunch" up
5) Tape to package

Voila!

Check out my 30 second video!


Tuesday, September 9, 2014

Rustic Decor for an Outdoor Party

Party planning is so much fun with creative people, and my family is crafty & creative!!  For my mom's 60th birthday party, my siblings and I threw her a great party.  The theme was "yellow + rustic+ garden + party" which is right up my family's alley. 

My grandpa has an old loft that holds many treasures so we scoured that and found some great "rustic" finds. 


Entrance to the back yard.  Mums on wood crates & a welcome sign painted by my sister. 
Mason jars are pretty trendy right now but thought it was the right touch for the Rum Punch signature drink.
Found an old window frame in my grandpa's loft and added black & white pictures and the yellow banner for decor.
Printed black & white photos and made a BIG 60 collage of pictures from childhood to present.  This made a statement and her friends enjoyed looking at the photos.
The flowers were my favorite!!  My sister found a bunch of vases in all shapes & sizes and painted them white.  Then we bought mini sunflowers, bupleurum & solidago.  We wanted a "thrown together" garden feel & this was it.

My second favorite was the bar.  My dad & brother really came through on this with the idea and executing it.  We placed mums on wood barrels, added a yellow bunting and voila!!
For the dessert table we used a burlap table cloth and found 2 old shutters at my grandpa's.  We used twine and clothes hangers to hang additional pictures of my mom.  

Galvanized buckets for beer with burlap bows was definitely a nice touch.
My sister made 8 tissue paper pom poms (who doesn't love these!?!)
All the mason jars were displayed in a wood tray. 


Wednesday, June 11, 2014

Darling Girl's Room!

A darling room for a darling girl!  I'm so happy with the way my daughter's room turned out.  It's light, bright and is perfect for a little girl.  


DIY Embroidery Hoops with stretched fabric

Stitched my daughter's nickname onto a piece of fabric.


je t'aime picture from Society6

Ikea kitchen is the BEST size!  Perfect for small rooms.  The bow hanger kite was another DIY project. Check my blog to see other pictures.   Eiffel Tower picture is from Etsy.